happychild2210

Wednesday, June 19, 2013

Using Visuals to Empower Our Children (free printable included)

Visual aids often rank high as a tool for productivity in children (and adults).  Visuals offer clear and concise directions for success.  They can allow for increased independence, which in turn can be very empowering for our children.  Just to clarify, we do not utilize rewards in our homes, these are simply visual aids that encourage independence and success.  

For some children, following a bed time schedule is easier than having Mom or Dad directing every move, and its also nice to have if you are trying to put multiple children to bed at the same time.


Bed time routine RL created for her middle daughter - bathroom, pajamas, brush teeth, books, stuffed chipmunk

It's not imperative that they do each step in succession, its just something that assists them along the way.  The routine is printed and laminated so it can be used each night.  The child checks off each task as its completed.

__________________________________

Another tool that is fun and encourages independence is creating a packing list for our children to utilize prior to vacations, school days, camp, etc.  For children who are not reading, take pictures of each item that needs to be packed (or use clip art).  You can also have the child take an active role in creating the list - they can draw and/or write items to be packed.  This is the visual list I created for our upcoming trip.  The printable is simply a chart.  In the middle I added the picture and name of item to be packed and left the other two blocks blank.  If you laminate it, you can then write in the number (cause this may change from trip to trip) and the child can check off each item as he/she adds it to the bag.  Of course, the number of items are always negotiable. 


Left - visual list before numbers
Right - visual list with numbers written in


Visual packing list for my son.


Packing and checking off the list.


For a free bed time visual template click on the links below. 

The template includes a chart like you see above with 10 options for pictures. 

Add to Cart

View Cart


You have read this article Connection / Independence / Instilling Capability with the title . You can bookmark this page URL https://happychild2210.blogspot.com/2013/06/using-visuals-to-empower-our-children.html. Thanks!
Tuesday, June 18, 2013

Hole Punch Letters


There was initially no "invitation" for this, but if I had set one up (which I did AFTER the fact), it would look like this....


Using hole punchers to identify letters and letter sounds.


As my son and I were playing in the playroom, he started cutting "tickets" out of construction paper.  He asked me to write the word "ticket" on them, and then he used his hole puncher to punch my ticket to get on the train.  Then he said, "now I need to punch the letters" and he sat and followed the line of the letters in the word "ticket".  I asked him if he would like to punch out more letters and he said yes - so I made more.  It seemed quite tedious to me, but he was really enjoying it and he was very engaged.  The tickets led to a letter game where I would write letters on a "ticket" and he would find the letter either by its name or its sound and punch a hole in it.

Tracing letters with the hole puncher and identifying letters with the hole puncher.

_______________________________________________


I later created a letter board for him and again I would say the name or the sound of the letter and he would punch it out.  He used his snowflake puncher for this....much more fun.

I used a paper cutter to cut out the "game board".


Finding a letter.


 This is such a great activity for strengthening the muscles in the hands and fingers, bilateral control, motor planning, visual motor skills, and coordination.

There are many other ways to create games similar to this....

number recognition
punch holes correlating to amounts
sight words
math facts
colors
shapes
etc...


- AK (MESE, MECD)


You have read this article Letters/Numbers / Rainy Day Play with the title . You can bookmark this page URL https://happychild2210.blogspot.com/2013/06/hole-punch-letters.html. Thanks!
Monday, June 10, 2013

TNT Letter Sounds

My girls love these little Pop-Its.  You can usually find them in local stores around Memorial Day and July 4th.  However, if you have a hard time finding them you can always order them online.  Amazon has a pretty big selection.  


POP-ITS... found at our local grocery store.  


I drew 10 letters on the driveway with chalk and put a circle around them.  I only started with 10 because I didn't want them to be overwhelmed.  


My girls can recognize all the letters of the alphabet so we've been exploring letter sounds.  I would say the letter sound, and then they would throw a Pop-It inside the circle with the corresponding letter.  


"Look, it's   /K/   /K/  K."  


Throwing a Pop-It on letter D.


My 3 year old loved this.  She would get so excited every time she found a letter. 

"Over here, over here!!  It's  /V/  /V/  V!!!!!


AK was inspired by this post, only she did it with water balloons.  She wanted to incorporate bother letter names and sounds, so she stated - "The name of the letter is __, and the sound is __.  Can you find it?"  She also included the words 'off' and 'on', because her son recognizes these two words thanks to their blender and all of the green smoothies he makes.  :)
Water balloons!

MORE IDEAS:

Sight words
Numbers
Math facts
Counting
Name recognition
Colors
Shapes
etc


RL 

You have read this article Letters/Numbers / Outdoor Play / SUMMER FUN with the title . You can bookmark this page URL https://happychild2210.blogspot.com/2013/06/tnt-letter-sounds.html. Thanks!
Friday, June 7, 2013

Mirrors, Sand, and Symmetry


Last year my mother bought a butterfly kit for my son from Insect Lore.  Unfortunately, the live caterpillars did not survive.  We recently purchased a new batch - perfect for a spring/summer project.  The entire experience was a huge hit!  We checked out books from the library, watched short videos about the life cycle of a butterfly, and took advantage of opportunities to play, create, and explore.  Once the butterflies emerged, we talked about symmetry.....which led to this fun activity.  I don't have a lot of pictures because it was pretty spontaneous - as the activity tray was already conveniently full of sand and held the mirrors as well.

Using the activity tray with mirrors, I showed him how to draw half of a butterfly in order to create reflected symmetry.  Then he tried.....


My son's butterfly....quite impressive considering he rarely to never draws....ever!


"Mommy, I need to draw the caterpillar in the chrysalis, too."


He drew a sun, too!


The fun continued and has been revisited since (sorry, no pics)....drawing shapes, clouds, rockets, and a flying ladybug.

**Colored sand can be purchased on amazon or in the craft section of Michaels craft store.**


- AK (MESE, MECD)
You have read this article Clay and Crafts / Rainy Day Play / Theme-based play with the title . You can bookmark this page URL https://happychild2210.blogspot.com/2013/06/mirrors-sand-and-symmetry.html. Thanks!
Friday, May 31, 2013

Bouncy Ball Basics

I don't have too many pictures of this because my 18 Month old help me set it up.  

What is needed:

Paint Palette

Balls that will fit in the slots (we used bouncy balls)
However, you could use:  Ping Pong balls, golf balls, etc.

Dry erase markers

You can set this up many different ways depending on the interests of your child.

Matching...Counting...Color Recognition... Patterns

Here are a few we tried.  


Here is my 18 Month old just randomly placing the balls in the slots as I counted for her.


Color Recognition... Yellow

"Look, they are all yellow."  

"You made a yellow circle!"


Color Match

Make a colored circle with the dry erase marker on the paint palette and present the coordinating balls.  


Number Match/Counting

I used a permanent marker on the balls for the numbers so it didn't come off as they held them in their hands.  If you scrub hard enough it will eventually come all the way off... at least mine did.  

For a short video of my youngest enjoying this activity click on the link below...


RL

You have read this article Letters/Numbers / Rainy Day Play with the title . You can bookmark this page URL https://happychild2210.blogspot.com/2013/05/bouncy-ball-basics.html. Thanks!
Tuesday, May 28, 2013

Duck River

"Embrace their childhood."
What does that mean?
Does it mean let them run wild with no boundaries?  
No.  
Does it mean take them to the beach to play while you read?  
Well, we all need some down time, but no.  

It probably means different things to different people and on different levels.  
For us here at Play at Home Mom, LLC it means following their lead, saying "yes", and rediscovering our own childhood with our children.  It means doing the best we can to take advantage of every playful opportunity - every day.  It means never having to look back and say "I wish I had played more with my children".


So today, when the thunderstorm cleared, we did just that.

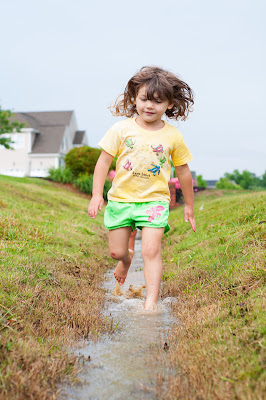
All you need for this activity is a drainage ditch, a good heavy rain, and some rubber ducks.  
Okay, so there may be other ways to improvise and recreate this activity, but our hopes are that after a hard rain we all think outside the box a little and take advantage of mother natures gifts. 


RL brought out some rubber ducks to send down the "river".
FUN!!

Catching the rubber ducks and enjoying splashing in the water.

I caught two rubber ducks!

Running down the "river" was just as fun as sending the ducks down.

Woo-hoo!!

Crawling through the tunnel after the ducks.


So the next time life feels like a thunderstorm...
think outside the box...
find your inner child...
and play!

- AK & RL
You have read this article Outdoor Play / Rainy Day Play / Water Play with the title . You can bookmark this page URL https://happychild2210.blogspot.com/2013/05/duck-river.html. Thanks!
Monday, May 27, 2013

The Unblogged


We post a lot of impromptu pictures that have potential to be blog worthy, but then we never end up blogging about them.  So, here is a quick picture list of some of our quality cell phone picture activities.

THE UNBLOGGED....

Visual bed time routine.  

Create a table in microsoft word, print, and laminate.  We attached ours to a clip board to keep on my daughters night stand.  She checks things off as she goes with a dry erase marker.  

Tape off a track on the floor for car play.

use rope lights and fabric to create a wonderful reading nook in small spaces.  This space is a built in for a TV.

Dollar Tree find.....colored containers and plastic ice cubes for sorting.


Mini DROP BOX.....color recognition.


Create your own tree blocks....all you need is a thick branch or thin tree trunk and a saw.


Tracing.....use sidewalk chalk to trace letters....names....shapes....etc.

Upper/lower case letter match.....use a Sharpie marker to write letters on shot glasses  and have the child match them up by nesting them on top of one another on the light panel - of course.

Bean bag toss....tape colored construction paper to the floor as well as challenge lines where the child is to stand and have them toss the bean bags onto the corresponding colors.

Oral Motor control.....tape colored paper to a table and have the children blow pom-poms through a straw onto its corresponding color.

Bath tub paint....shaving cream colored with liquid watercolors.

Imaginative play....fishing in the bath tub.

Wire play - similar to our WIRED POST.....using floral wire to create.

Use magnetic beads on the magnet board.  Make various sized strands of magnetic beads, create letters and print them, then use them on the magnet board......the child uses the templates and bead strands to build the letters.

Ball ramp - simple fun with a bowl of balls and a gutter!

Colored design tape and overhead transparencies on the light panel.

Painting lanterns

Similar to our MAGNETIC PUMPKIN, we created a magnetic snowman.  Tape white circles to the magnet board and allow child to use DIY MAGNETS to build a snowman.

Use play doh number stampers to stamp numbers into sand on the light panel

A spin off of our ILLUMINATED EASTER EGG HUNT.....letter find and building words.  Use a sharpie to write letters on the eggs.

Building with sugar cubes.  Use powdered sugar and water mixed together as a "glue" to build towers, houses, and more!!


Im sure we will add to this list as we come across pictures we have posted and never really blogged about.....and as the questions start rolling in.

- PAHM


You have read this article with the title . You can bookmark this page URL https://happychild2210.blogspot.com/2013/05/the-unblogged.html. Thanks!