Wednesday, August 29, 2012

Suminagashi

We saw this extremely cool marbling technique over at The Artful Parent, but she credits the original post back to Inner Child Fun, so we would be remiss not to link it to her as well.  When we saw it, both RL and I knew it was something we wanted to offer to our children.  RL bought two marbling kits and she was kind enough to let me have one of them.  Something I really like about the kit is that a little ink goes a long way.....something that I didn't like about the kit is that it says "for children ages 6 and up".  HA!  Another gross underestimation of the abilities of toddlers.  ;) 

My son, who is typically not a huge fan of artsy activities.....LOVED THIS!!  He thought it was "so cool" when the paint brush touched the water and the colors dispersed, and the prints were "fantastic".  We did this on the light panel because it made the colors easier to see.  We also gently blew the colors around to swirl them as classical music was playing in the background....that really got us into a swirly, whimsical kind of mood.  LOL


Dabbing on the ink with a paintbrush

Putting card stock paper on the surface of the water to absorb the inks


SO COOL!

Pretty!

I think he liked this activity.

We've done this activity several times since we first purchased the inks.  I'm sure this will be a long standing favorite in our house.  Both my girls (3.5 years and 2.5 years) loved this as well.  


We took a little bit of a different approach.  I asked my girls if they wanted to drip the ink on out of the bottle or use a paint brush.  The decided to squeeze it right out of the bottle.  After seeing the way my 2.5 year old uses food coloring my first thought was "She is going to squeeze that until there is nothing left!"  I explained beforehand that she only needed a drop or two of each color to create her design and it was never an issue.  

Directions will come in the box.  You basically fill your container up with about 2 inches of water and start creating!  These little white circles came with the ink set.  You drop the ink on the paper and it disperses in the water.

Above is my 2.5 year old.  She loved chasing the little paper circle around to drip her ink on.  


The design


Placing the paper on.


"Look!!  I made a print.  Do you see all the colors?" - 3.5 years


"Oh, I love the way you mixed orange and blue.  The orange goes all the way around the blue.  That's cool."  - 3.5 years


Here my oldest is gently blowing on the ink.  


After numerous attempts at this I found it is best to place your prints between two pieces of paper towels and lay something heavier on top.  We did this while they were still wet and let them sit over night.  The first time we did this we just let them sit out and the edges curled up quite a bit.  


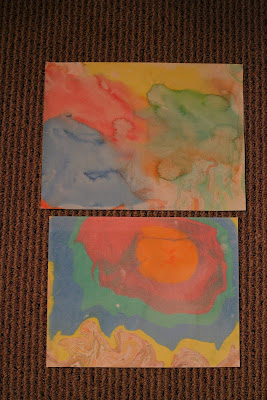
Here are our finished prints.  The top print is done with watercolor paper and the bottom with card stock.  They give you different effects.  

We plan to cut these to note card size and use them as thank you cards after my oldest daughter's art party.  

The kits can be purchased HERE.


You have read this article Clay and Crafts / Playing with Light / Rainy Day Play with the title August 2012. You can bookmark this page URL http://happychild2210.blogspot.com/2012/08/suminagashi.html. Thanks!

Balance Beam

My daughter has a balance beam at her preschool. She loves it...most of the kids do. One day I looked outside and her dad had rigged a balance beam of sorts for her. They were having such fun I had to leave dinner prep and snap some quick pictures.

Yes, this is 2 coolers, 2 wooden beams & 1 piece of slate

Our dog TJ was happy to play along as well...


Can't you hear the sqealing laughter and the playful bark?!

I wasn't excited about the apparent haphazardness of this not-so-solid construct. But logistically the end pieces would only slide off onto the ground and she was barely a foot off the ground. I gave in to the sounds of laughter and the sight of her in her 2 dresses and skirt.

"Watch me, Mama!"

"I'm going to try it myself, watch"

Sometimes it's important to balance our fears with most-likely outcomes versus worse-case outcomes. And to remember that while we want to protect them from pain, we also  want to help them develop a sense of themselves, their capabilities, their limitations, and their ability to get up and try again. And also to remember that not everything has to be beautiful and perfect in order to have value!
You have read this article with the title August 2012. You can bookmark this page URL http://happychild2210.blogspot.com/2012/08/balance-beam.html. Thanks!
Tuesday, August 28, 2012

Letter/Number Pop!

Here's a fun game you can play with all of that bubble wrap you receive in your upcoming holiday gift packages.  The larger bubble wrap works best.  All you need is a Sharpie marker (you can use stickers as well, but we wanted it to show up on the light panel, so we used markers).  Aside from being fun - what kid doesn't love bubble wrap - it's also great for motor skills.

I wrote the letters on the BOTTOM of the bubble wrap, which meant I had to write them all backwards....yes, if you look closely I made some mistakes.  Oops.


INVITATION:  Number recognition / Upper case letters


Upper/Lower case letters.....letters are written in the same color based on the level of the child.


There are so many ways you can tweak this to make it appropriate for the level of the child.  Here are a few ideas.....

  • numbers
  • numbers and dots for counting
  • upper case letters
  • lower case letters
  • upper & lower case with like letters written in the same color
  • upper & lower case with like letters written in different colors
There are also several ways you can present this activity and interact with the child.  Here are a few ideas....

  • present it as a game of BINGO POP - where you call out a letter/number and the child pops the letter/number
  • simply allow the child to pop at will while you track his/her play - "you popped letter B" (this is what I did)
  • phonics BINGO - you say letter sound, child pops corresponding letter

I set up the invitation not knowing whether or not my son would take interest.  He did, but he was tired and found popping the bubbles on the light panel frustrating (which was escalated by his fatigue).  It was easier for his little - tired - fingers to pick up the bubble wrap and pop it.  Given the circumstances it was not a "huge hit", but I imagine it may be on a different day. 


- AK (MESE, MECD)
You have read this article Letters/Numbers / Playing with Light with the title August 2012. You can bookmark this page URL http://happychild2210.blogspot.com/2012/08/letternumber-pop.html. Thanks!
Monday, August 27, 2012

Stamping on Sticky Paper

Materials needed:

Clear Contact Paper

I set this up on the light table.  However, this can also be done with the contact paper hanging in a window or just laid out on any table.  The colors were very vibrant with the light shining through.  


The invitation  


My oldest (3.5 years) dove right into this by telling stories with the stamps. 


"A big elephant was walking through the jungle.  He stopped to smell the flowers."


My daughter was not interested in spelling out words but I just wanted to show an alternative to this.  We used jeweled letters but alphabet stampers would work great as well.  


I put out primary colored stamp pads because my girls have been very interested in color mixing lately.  

My oldest wanted to make purple stars.  

"We don't have any purple.  I think I can make purple by mixing red and blue.  Let me try.  I did it!!!  It's purple!!!!"  


My 2.5 year old loved this as well.  

The stampers in this post can be seen HERE

RL 


You have read this article Clay and Crafts / Playing with Light with the title August 2012. You can bookmark this page URL http://happychild2210.blogspot.com/2012/08/stamping-on-sticky-paper.html. Thanks!
Sunday, August 26, 2012

Paint Roller Painting

DO NOT TRY THIS IF YOU HAVE CONCERNS ABOUT STAINS.

My son has always loved using the paint roller - even just to pretend.  He played a role in painting his bedroom as well as his playroom.  Recently, he has been taking out the roller to pretend to paint, so I thought I would set up an invitation for him.  We tackled this on a small scale one morning....painting the back porch........

Painting the back porch.

Our back porch is stained and the paint washed off nicely.  We used a basic washable tempera paint.

Today I set up an invitation for him to paint the driveway.  It was a huge hit, but didn't wash off as easily.  There is a very slight stain, but I'm confident it will fade with time.  
I would not try this on surfaces that are highly porous.  

Invitation


.....and then my camera died.


- AK (MESE, MECD)

You have read this article Outdoor Play / Paint Play with the title August 2012. You can bookmark this page URL http://happychild2210.blogspot.com/2012/08/paint-roller-painting.html. Thanks!
Saturday, August 25, 2012

Ice Play....The Frog Castle

Playing with ice is a favorite activity at our house.  You can see several more ice play ideas at these links…


I let my son choose some new molds for ice play (I showed him pictures and he chose the ones he wanted).  He picked people and frogs.  I love the people because they actually have different emotions, which made for a fun opportunity to talk about emotional intelligence.


The Invitation

People

He counted the people and found the corresponding number.


I asked him how many blue blocks he lined up.  He didn't say a word, just got the #5 and put it next to them.

Three frogs

"Look, Mommy.  I made a frog castle.  This is the frog who lives here."

"Red, blue, red, blue, red blue......  I made a pattern."

"It's a bridge for the people to cross on their way down the path to the frog castle."


- AK (MESE, MECD)
You have read this article Outdoor Play / SUMMER FUN with the title August 2012. You can bookmark this page URL http://happychild2210.blogspot.com/2012/08/ice-playthe-frog-castle.html. Thanks!
Saturday, August 18, 2012

Alphabet Blocks.....of Ice.

Alphabet ice blocks


 Our first play with these perfect cube ice molds ------>  is HERE.  Today, we revisited them in a whole new way - alphabet blocks.  So fun!  We used LETTER JEWELS and simply froze them in the molds.

Check out more alphabet ice play -----> HERE.

  Its an obvious opportunity to learn about hot/cold, melting, properties of water, etc.....but you can also.......


...talk about and build sight words - for older children.


...create the alphabet....or play "insert the missing letter"


...incorporate heavy machinery


"Its carrying the K block"

...smash them......there are NO letter in the ones he smashed

...build CVC words - for older children
Just explore, play, and have fun!!

Some other options...

  • put same colored letters together
  • stack cubes
  • slide them down a rain gutter - "there goes the G block"
  • separate into consonants and vowels
  • spell name
  • match letters to objects with corresponding beginning sounds
  • etc................


- AK (MESE, MECD)
You have read this article Outdoor Play / SUMMER FUN / Water Play with the title August 2012. You can bookmark this page URL http://happychild2210.blogspot.com/2012/08/alphabet-blocksof-ice.html. Thanks!