We saw this extremely cool marbling technique over at The Artful Parent, but she credits the original post back to Inner Child Fun, so we would be remiss not to link it to her as well. When we saw it, both RL and I knew it was something we wanted to offer to our children. RL bought two marbling kits and she was kind enough to let me have one of them. Something I really like about the kit is that a little ink goes a long way.....something that I didn't like about the kit is that it says "for children ages 6 and up". HA! Another gross underestimation of the abilities of toddlers. ;)
My son, who is typically not a huge fan of artsy activities.....LOVED THIS!! He thought it was "so cool" when the paint brush touched the water and the colors dispersed, and the prints were "fantastic". We did this on the light panel because it made the colors easier to see. We also gently blew the colors around to swirl them as classical music was playing in the background....that really got us into a swirly, whimsical kind of mood. LOL
My son, who is typically not a huge fan of artsy activities.....LOVED THIS!! He thought it was "so cool" when the paint brush touched the water and the colors dispersed, and the prints were "fantastic". We did this on the light panel because it made the colors easier to see. We also gently blew the colors around to swirl them as classical music was playing in the background....that really got us into a swirly, whimsical kind of mood. LOL
 |
| Dabbing on the ink with a paintbrush |
 |
| Putting card stock paper on the surface of the water to absorb the inks |
 |
| SO COOL! |
 |
| Pretty! |
Placing the paper on.
"Look!! I made a print. Do you see all the colors?" - 3.5 years
"Oh, I love the way you mixed orange and blue. The orange goes all the way around the blue. That's cool." - 3.5 years
Here my oldest is gently blowing on the ink.
After numerous attempts at this I found it is best to place your prints between two pieces of paper towels and lay something heavier on top. We did this while they were still wet and let them sit over night. The first time we did this we just let them sit out and the edges curled up quite a bit.
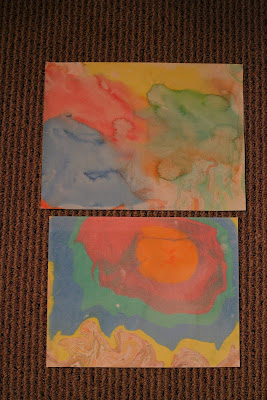
Here are our finished prints. The top print is done with watercolor paper and the bottom with card stock. They give you different effects.
We plan to cut these to note card size and use them as thank you cards after my oldest daughter's art party.
The kits can be purchased HERE.
You have read this article Clay and Crafts /
Playing with Light /
Rainy Day Play
with the title Suminagashi. You can bookmark this page URL http://happychild2210.blogspot.com/2012/08/suminagashi.html. Thanks!


Thanks for sharing!
ReplyDeleteTanjore Paintings| Thanjavur Paintings| Tanjore Art online
Online Shopping | Buy Glass Paintings Online at Best Prices | Tarang Arts
Buy Online Handmade Paintings | Marble Painting | Tanjore Art |tarang Arts
Madhubani Paintings|buy Madhubani Paintings Online at Low Price | Crafts
Kerala Murals Paintings | Tanjore Paintings | Tanjore Art | Tarang Arts