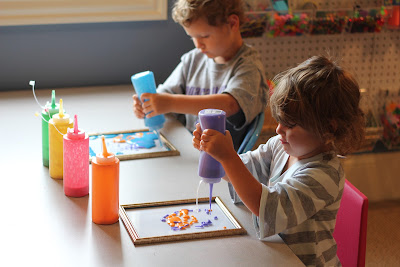
This is probably our all time favorite paint recipe. You can see the paint recipe HERE.
It is typically done on cardboard like our cardboard Christmas cutouts seen HERE
I always want to hang these after we are done and I could never figure out how I wanted to do it. I found a solution! I had no clue if this was going to work but what a fun adventure it was!
Materials used:
Liquid watercolors... seen HERE
Self-rising flour
Clear condiment bottles from Walmart (kitchen section)
Salt
I'm going to post the recipe here as well because I know none of you are going to click on the above link. :-P
Recipe:
MICROWAVE PUFFY PAINT
- 4 Tbsp self rising flour
- a few drops of food coloring or liquid watercolors
- 4 Tbsp salt
OR
- 1/2 cup flour
- 2 tsp baking powder
- 2 tsp salt
- food coloring
Add water to make a smooth paste.
Pour into bottles or apply with a paintbrush.
Microwave for 1:30-2:00 minutes.
When you do these on cardboard you only need 20-30 seconds. However, it took a lot longer to puff on the glass.
The Invitation
Puffy paint and picture frames from Dollar Tree.
I was kinda nervous that the glass was going to crack in the microwave but it survived!
My oldest (3.5 years) applying paint to the glass frame.
"I'm going to make a dinosaur"
My middle girl (29 months) having a go.
Hard at work.
This picture cracked me up. My 29th month old closed all the tops and wiped them down after she was done. However, for all the people that know her... she ALWAYS has stuff on her face and is a little ragamuffin. She'll wipe down paint off a table before she wipes her own face. :-P
"Can you help me with the green please?"
This was my oldest's after she was done BEFORE it went into the microwave.
*****MAKE SURE YOU JUST MICROWAVE THE GLASS... NOT THE FRAME*****
The glass will be a little hot so wait a minute or two before you remove it.
Here they are after they were microwaved. My youngest woke up so I ran to get her out of her crib. When I came back my oldest had taken her finger and was smearing the paint all over. On the inside I was thinking "Ah man... what did you do???" A pure example that it's about the process NOT the product!! After I held myself together (LOL), I looked and she had the biggest smile on her face. We all laughed and hung up her masterpiece to enjoy.
Since my 29 month old saw how funny it was to run your fingers through. She had to give it a try, too.
My 29 month olds. These also look great in the window.
My 3.5 year old.
I love the texture her finger smears gave it!
Next time I may have to throw in a few tools to use. :-)
Here is another one that my oldest did. Pre-microwave. We were running low on paint so I added a little more water. As you will see below, this one puffed a lot more. Next time around we won't make the paint so thick.
"There is a lady bug in the middle!"
Up on the wall. :-)
RL
You have read this article Clay and Crafts /
Paint Play /
Rainy Day Play
with the title 3D Painted Picture Frames. You can bookmark this page URL http://happychild2210.blogspot.com/2012/07/3d-painted-picture-frames.html. Thanks!


No comment for "3D Painted Picture Frames"
Post a Comment